Custom Salesforce Button to Execute JavaScript
I make everyone on my team track their time using a custom Time_Card__c object in our Salesforce org. At the end of each pay period I have to update the Status field on these Time_Card__c records to something and most often the status is set to "Paid." Since it can be frustrating to update many records repeatedly to the same value and some folks don't like using the Excel Connector or Data Loader to perform mass updates, I thought that it would be easier to create a custom button where I could select the records from a Time Card list view or Project Detail page related list and then click a button and have Salesforce update the records in mass via JavaScript.
I think that some administrators overlook the simplicity of this type of "execute javascript on a button" logic and a good practical example of how this works could allow those unfamiliar to try it out. So this post is going to cover creating a custom button for the Leads object that will allow users to select Leads in mass via the user interface and then update the Status field on all selected records to "Unqualified."
The first step in this process is to create a custom button for Leads. To do this get into your org "Setup," select "Customize" under the "App Setup" listing then "Leads" and finally "Buttons and Links." On the resulting page you will find a listing of your standard Lead buttons and any overrides for them in addition to a section listing custom buttons and links. Scroll down to the "Custom Buttons and Links" section and click the "New" button.
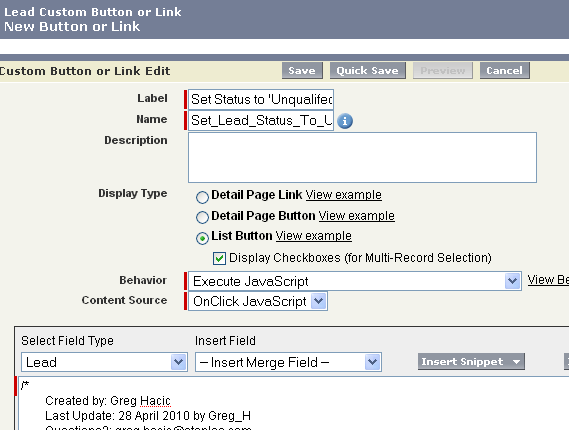
The next page will allow you to dictate how you want the button to display on the page and function when clicked. Provide a "Label" for your button. This will be the actual text listed in the button on the page layout. After you tab (or click) out of that field Salesforce should auto-populate the "Name" field. Choose the "Display Type" of "List Button" and check the box next to the "Display Checkboxes (for Multi-Record Selection)" option. For "Behavior" you should select "Execute JavaScript" and for "Content Source" you should select "OnClick JavaScript." Please see the screenshot below for an illustration.
The last piece for setting up the button is to provide the actual JavaScript that should fire upon click of the button, which you are creating. The code for that JavaScript is below:
/*
	Created by: Greg Hacic
	Last Update: 14 July 2010 by Greg Hacic
	Questions?: greg@interactiveties.com

	NOTES:
		- Updates selected Lead records with a status of "Unqualified"
		- Display Type is "List Button"
		- Select Display Checkboxes (for Multi-Record Selection) option is selected
		- Behavior is "Execute JavaScript"
		- Content Source is "OnClick JavaScript"
*/
{!REQUIRESCRIPT("/soap/ajax/19.0/connection.js")} //adds the proper code for inclusion of AJAX toolkit
var url = parent.location.href; //string for the URL of the current page
var records = {!GETRECORDIDS($ObjectType.Lead)}; //grabs the Lead records that the user is requesting to update
var updateRecords = []; //array for holding records that this code will ultimately update

if (records[0] == null) { //if the button was clicked but there was no record selected
	alert("Please select at least one record to update."); //alert the user that they didn't make a selection
} else { //otherwise, there was a record selection
	for (var a=0; a<records.length; a++) { //for all records
		var update_Lead = new sforce.SObject("Lead"); //create a new sObject for storing updated record details
		update_Lead.Id = records[a]; //set the Id of the selected Lead record
		update_Lead.Status = "Unqualified"; //set the value for Status to 'Unqualified'
		updateRecords.push(update_Lead); //add the updated record to our array
	}
	result = sforce.connection.update(updateRecords); //push the updated records back to Salesforce
	parent.location.href = url; //refresh the page
}
I put some good comments in the code so you can understand exactly what each line is attempting to do. The one portion of the code I would like to highlight is the line that declares the "url" variable and the line that reads "parent.location.href = url."
I've seen some examples out there where the developer will indicate that the line for refreshing the page is "window.location.reload();" instead of what I coded. The reason I did not use the reload method is because this will not work in Firefox.
After you have pasted the code from above into your org you should click the "Save" button. An alert message will pop up reading "The new custom button will not be displayed to users until you add it to the search layout." Simply click the "OK" button in the alert.
You will then be sent to the detail page for the button that was just created. Navigate to the "Search Layouts" admin page for your Lead object within "Setup." There you will click the "Edit" link located to the left-hand side of the row reading "Leads List View" as the "Layout Name." Under the "Custom Buttons" section of the resulting page simply move the button you created into the "Selected Buttons" option and click the "Save" button.
To test the functionality you can navigate to the Leads tab and select any list view. Once on the view you will see the new button. Select some leads using the checkboxes to the left-hand side of the record list and click the custom button.
I understand that this type of functionality is not needed within any orgs due to the fact that there is a standard "Change Status" button on Lead list views that allows you to do the same thing. However, the code and steps will allow you to literally copy & paste the logic into your org so you can see how to apply it to other, more practical, business needs.
Author

I've been working with Salesforce since 2003. Over the years, I've held various roles for a diverse array of salesforce.com customers, created a Salesforce specific ISV, and built numerous applications for the AppExchange. All of these experiences have allowed me to learn quite a bit about building on the platform.