
Pass Values to New Opportunity Using URL
Pass values to a new Opportunity via a custom button using nothing but the URL. This can be useful if you want to default some values on the detail page when new records are being created. It can save your Users some time so they don't need to fill out every field. It will also allow you to provide some guidance for values you want provided when new records are created in your organization.
First we will create the custom button. In this example we are going to use a custom button on the Opportunity object. Navigate to Setup > Customize > Opportunities > Buttons, Links, and Actions. Click the New Button or Link button on that page. The initial configuration:
Since the URL reference will be relative we will want to start out with a slash (/). Then we need the prefix for Opportunity, which happens to be 006 and then we need to indicate that we are creating a new record by appending slash and the character "e". Putting that together so far we have:
/006/eNow we need to pass some key value pairs that tell the new record page which fields we want populated and with what values.
Below are the keys that we will use in this example:
Since our new button will be accessed from the Contact detail page of any given Contact, the values we use for each of the above keys will be based upon the information that we have on (or related to) the Contact record. Here are the keys from above but now with the values we plan on using.
Some of the values need to be dynamic so we will use Salesforce merge fields instead of strict text values. The dynamic merge fields all begin with the {! characters and end with }. Since the URL cannot contain spaces we have used the plus (+) character in place of spaces for any non dynamic values that we simply want to default.
Each key value pair must be separated by an ampersand (&) except for the first, which must use a question mark (?).
Putting it all together we have the following for our URL value:
/006/e?accid={!Account.Id}&conid={!Contact.Id}&opp6=External+Referral&opp11=Prospecting&opp9={!TODAY()}&opp14=This+was+created+by+from+a+custom+button+click&opp3={!Account.Name}+-+X+Widgets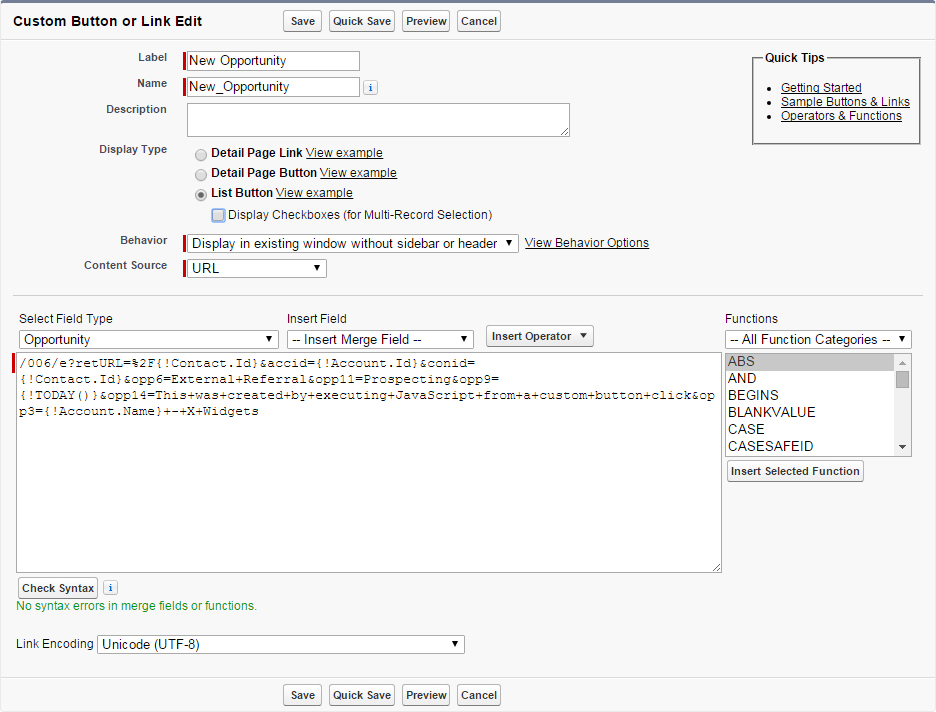
Now that the button is created we need to add it to the page layout.
- Navigate to Setup > Customize > Contacts > Page Layouts.
- Click the Edit link on the left hand side of your page layout.
- Scroll down to the Opportunities related list.
- Click the wrench, which denotes the related list properties.
- Within the modal window click on the Buttons bar to see the available buttons.
- Move the New Opportunity button into the selected area.
- Uncheck the box next to the New standard button.
- Click the OK button.
- Save the page layout.

The benefit of passing values in this way is that you can do it without having to deploy any Apex code. This provides you the flexibility of modifying the logic from directly within your production org.
Author

I've been working with Salesforce since 2003. Over the years, I've held various roles for a diverse array of salesforce.com customers, created a Salesforce specific ISV, and built numerous applications for the AppExchange. All of these experiences have allowed me to learn quite a bit about building on the platform.