Do not create a new opportunity upon Lead conversion using Apex and Visualforce
My client has a use case where they want to convert a Lead but not create an Opportunity at time of conversion. The standard Lead conversion page is fine with the business owners but they want the "Do not create a new opportunity upon conversion" checkbox selected when the page is accessed by the Users in their org. This will allow Users to create an Opportunity in certain cases but default the option to false otherwise.
The short answer is that you simply need to pass a parameter in the URL request for the page that will tell the system to check that input checkbox when the page is rendered. This parameter is:
nooppti=1For example the full URL would look something like this:
https://na2.salesforce.com/lead/leadconvert.jsp?retURL=%2F00Qa000001HO8el&id=00Qa000001HO8el&nooppti=1So now how do you make the URL look like that when a user clicks the standard "Convert" button on the Lead detail page?
I've seen varying examples of how to accomplish this but wanted to post a complete example utilizing Visualforce & Apex.
The first thing we need is a controller:
/*
	Created by: Greg Hacic
	Last Update: 28 March 2014 by Greg Hacic
	Questions?: greg@interactiveties.com

	Notes:
		- Directs the User to the standard Lead conversion page but pre-populates the "Do not create a new opportunity upon conversion." checkbox
*/
public class leadConvertButtonOverride {

	private final Lead lead; //variable for the standard Lead object

	public leadConvertButtonOverride(ApexPages.StandardController standardPageController) {
		this.lead = (Lead)standardPageController.getRecord(); //initialize the standard controller
	}

	public PageReference redirectToConvertionPage() {
		PageReference nextPage = new PageReference('/lead/leadconvert.jsp'); //set the starting point for the page reference to which the User will be sent
		nextPage = encodeAndSetParam(nextPage, 'retURL', lead.Id); //set the retURL parameter in order to allow for returning to Lead if User cancels from page
		nextPage = encodeAndSetParam(nextPage, 'id', lead.Id); //set the id parameter so that the conversion page knows the proper record
		nextPage = encodeAndSetParam(nextPage, 'nooppti', '1'); //set the nooppti parameter to pre-populate the "Do not create a new opportunity upon conversion." checkbox
		nextPage = encodeAndSetParam(nextPage, 'nooverride', '1'); //set the nooverride parameter in order to prevent looping in the user interface
		nextPage.setRedirect(true); //indicate that the redirect should be performed on the client side
		return nextPage; //send the User to the Lead conversion page
	}

	public PageReference encodeAndSetParam(PageReference passedPageReference, String passedParameterId, String passedParameterValue){
		if (passedParameterValue != null) { //if the passedParameterValue is not null
			String encodedParameterValue = EncodingUtil.urlEncode(passedParameterValue, 'UTF-8'); //encode the value that was passed to eliminate conflicts with unsafe characters
			passedPageReference.getParameters().put(passedParameterId, EncodingUtil.urlDecode(encodedParameterValue, 'UTF-8')); //add the parameter to the page reference
		}
		return passedPageReference;
	}

}
The second thing we need is a Visualforce page:
<!--
	Created by: Greg Hacic
	Last Update: 28 March 2014 by Greg Hacic
	Questions?: greg@interactiveties.com

	Notes:
		- Directs the User to the standard Lead conversion screen but pre-populates the "Do not create a new opportunity upon conversion." checkbox
-->
<apex:page action="{!redirectToConvertionPage}" extensions="leadConvertButtonOverride" standardController="Lead">
	<apex:sectionHeader title="Convert Lead" subtitle="{!Lead.Name}" help="/htviewhelpdoc?id=leads_convert.htm&siteLang=en_US"></apex:sectionHeader>
	<apex:pageMessages></apex:pageMessages>
</apex:page>
The third thing we need is the Apex Test method so we can deploy this code later:
/*
	Created by: Greg Hacic
	Last Update: 28 March 2014 by Greg Hacic
	Questions?: greg@interactiveties.com

	Notes:
		- Tests the logic for leadConvertButtonOverride.class
		- Provides 100% (16 of 16 lines) as of 28 March 2014
*/
@isTest
private class leadConvertButtonOverrideTest {

	@isTest //defines method for use during testing only
	static void complianceTabOverrideTest() {
		//BEGIN: perform some setup steps...
		List<Lead> leads = new List<Lead>(); //lead list
		leads.add(new Lead(Company = 'Dachshund Technology Corp', Email='tess@ities.co', FirstName = 'Tess', LastName = 'Dachshund'));
		insert leads; //insert leads
		//END: perform some setup steps...
		Test.startTest();
		PageReference pg = Page.leadConvertButtonOverride; //create a page reference to our new lead conversion visualforce page
		Test.setCurrentPage(pg); //set the page
		ApexPages.StandardController cont = new ApexPages.standardController(leads[0]); //set the controller for our test lead record
		leadConvertButtonOverride ext = new leadConvertButtonOverride(cont); //call the extension
		String validationURLString = ext.redirectToConvertionPage().getURL(); //get the URL that is returned after the redirectToConvertionPage() method is invoked
		String leadIdAsString = String.valueOf(leads[0].Id); //get the lead Id
		System.assertEquals(true, validationURLString.contains('id='+leadIdAsString.left(15))); //validate that the page contains thelead record Id
		System.assertEquals(true, validationURLString.contains('nooppti=1')); //validate that the URL contains 'nooppti=1'
		System.assertEquals(true, validationURLString.contains('/lead/leadconvert.jsp')); //validate that the URL contains '/lead/leadconvert.jsp'
		Test.stopTest();
	}

}
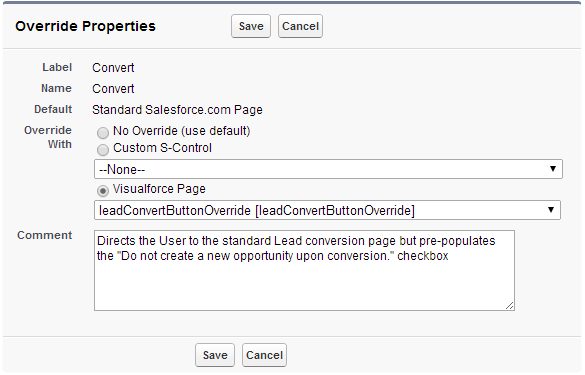
The last thing we need is the setup for the button override. This can be done as follows:

You could use a custom button invoking JavaScript but I think this thorough example provides additional Apex details that can be good for learning the Apex programming language or building on your existing knowledge of Apex.

